:::Welcome:::
Hello & Welcome to Enchanted Obsessions!
My new home for my tutorials, Masks from my old site Enchanted By Darkness.
Hopefully I will get some new tutorials up for you, If my mojo ever comes back!!
••••
Enjoy your visit!
Hugs Rachel
-x-
My new home for my tutorials, Masks from my old site Enchanted By Darkness.
Hopefully I will get some new tutorials up for you, If my mojo ever comes back!!
••••
Enjoy your visit!
Hugs Rachel
-x-
•Tut Obsessed •
Followers
Friday, 15 March 2024
08:23 | Edit Post
Or you may use colours to match your image.
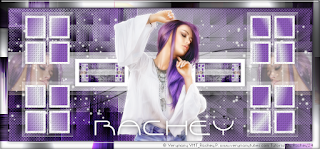
Open a new canvas 800x350
In your colour palette Place colour Black in the background & Foreground #e5e6ea(colour of choice)
On the foreground tab choose Gradient with these settings:
-Foreground-Background -Radial-
Angle-0 Repeats-4
-Invert
-Horizontal-38 -Vertical-35
Fill your canvas with Gradient then Duplicate this layer.
Making sure you're on the Duplicate layer go to effects:
L&K-Andreas-Default settings.
Change the blend mode to Multiply, Merge down.
Bring up the 4 square shape & paste as a new layer.
Deform tool Position X:45.00 Position Y:20.00
Duplicate the squares/Image-Mirror,Merge down.
Duplicate & flip, Merge down.
Make sure you are on the bottom layer(Raster1) New raster layer & floodfill with the colour #e5e6ea
Layers/New mask layer from image-Narah_Mask_0943 /Merge group.
Still on the mask layer-Go to Effects/Edge effects-Enhance, Lower the opacity to 75.
Duplicate Raster 1 layer,Arrange/Move up(once)
Effects/Mehdi-Sorting tiles:
Block Range:150-300
Block:150
Click on Plus, Ok.
Image/Rotate/Free Rotate:Left-90 degrees.
Deform tool Position X:-10.00 Position Y:-226.00
Change the blend mode to Overlay.
Effects/Edge effects-Enhance.
Close out the squares layer & merge visible,Keep closed for now.
On the bottom layer(mine is called Merge) Add a new Raster layer & fill with Black.
Layers/New mask layer from image-Narah_Mask_1215 /Merge group,Duplicate & merge down.
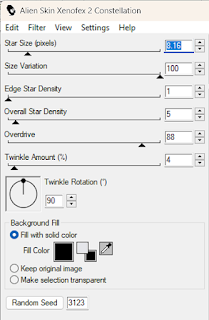
Still on this mask layer Go to effects/Xenofex2-Constellation, using these settings:

Ok now open your squares layer again.
In your colour palette make a new Gradient with these settings:
Forgeound #e5e6ea
Background #8e5eba
Select your magic wand, click on the squares layer/Selections Invert/Selections/Modify & Contact by 2.
New raster layer below the squares layer & fill with your Gradient.
Keep selected. :Effects/Texture effects/Weave.
Screenshot.
Select None.
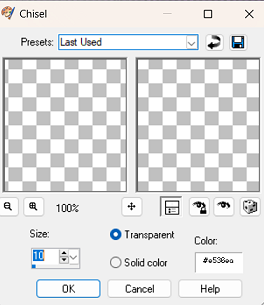
Still on the Gradients layer go to effects/3D Effects/Chisel.

Add a subtle noise effect to the squares.
Added the dotted lines above the mask layer.
Deform tool Position X:73.00 Position Y:90.00
Paste the line above the mask layer
Deform tool Position X:0.00 Position Y:116.00
Effects/3D Effects/Chisel.
Use the same settings as above,Effects/Edge effects/Enhance.
Still on the line layer/Selections/Select All/Selections/Float/De float.
Paste you tube/Image as a new layer & place as you like,Selections/Invert/Delete,Select none.
Duplicate/Image mirror.
Click on your top layer-Edit Copy Merged & paste as new image.
Close the main image for now as we are working on the copy.
On the copy go to image resize 15% all layers checked.
Image add borders,Colour white,Symmetric checked border is 10.
Edit copy, bring up your main image & paste as a new layer(make sure you're on the top layer)
Deform tool Position X:176.00 Position Y:134.00
Duplicate/Image/Mirror,Merge down & Sharpen.
Add a drop shadow.
Copy & paste your tube/image as a new layer,Resize(make sure to uncheck all layers) & place in the middle.
Image add borders:Symmetric checked.
Add border 1 pixel Colour #8e5eba
Image add border #8e5eba 20 pixel colour
with your magic wand click inside the 20 pixel border.
Go to Effects/Mehdi/Sorting Tiles:
Block Range:150-300
Block:150
Click on Plus, Ok.
Repeat once more.
Then go to Effects/Eyecandy 5- Glass.
Use the Clear preset 2 times.
Select none.
Add your Text/Name & ©.
All done!
If you are having any problems with this tutorial or would like to share your results for me to add to my Blog please contact me Here
Thank you, Hugs Rachey♥
Tutorial By Rachey written on March 15th 2024. Using PSP9
Any similarities to this tutorial are purely coincidental & unintentional.

Labels:.•. New Tutorial .•.
Subscribe to:
Post Comments
(Atom)
•Enchant Me •
Categories
- .•. New Tutorial .•. (41)
- •Angie Monasterio Cilm• (1)
- •Anthony Guerra CDO• (1)
- •Anthony Guerra Cilm• (1)
- •Armando Huerta Mpt• (1)
- •Barbara Jensen• (5)
- •Bryan Hey Mpt• (1)
- •Chip Legal• (1)
- •Elias Chatzoudis mpt• (11)
- •Ismael Rac mpt• (5)
- •Jamie Kidd Cilm• (1)
- •Jennifer Janesko Cilm• (3)
- •Jessica Dougherty Cilm• (2)
- •Keith Garvey• (14)
- •Martin Abel Cilm• (3)
- •Michael Calandra Mpt• (1)
- •Michael Landedfeld Cilm• (1)
- •PinUp Toons Cilm• (1)
- •Suzanne Woolcott• (3)
- •Verymany (6)
- Banner Tut's (5)
About Me

- Rachey
- I'm 52 live in a lil village in South Yorkshire UK. I love going to gigs. Especially Rock or Punk..


0 comments:
Post a Comment