Thursday, 16 June 2016

Supplies
Tube of your choice
Font of choice
Brushes of choice
MuRa's Miester- Clouds
VM Extravaganza - Transmission
AnimationShop
My Supplies Here
I am using the beautiful art of Jasmine Becket-Griffith,
you need to purchase a license to use her art you can get it CDO
On with the Tutorial.
Open up all the supplies into Psp.
1,Open a blank canvas 700x600, Flood fill white.
Bring up the oval shape copy, paste as new layer onto
the blank canvas.
Still on the oval shape go to selections/select all/float/defloat/selections/modify/contract
10/Invert.
Open up the tree tube, place into position, add the tombstone
& tube place all into position.
When you are happy hit delete. Add a subtle drop shadow to the
tubes.
2, Make sure you're on the oval shape layer & duplicate.
Layers/Arrange/Move down.
Go to Adjust/Blur/Gaussian Blur Size - 35 or whichever you
think looks best.
Go to Effects/Vm Extravaganza/Transmission use the default
settings.
3, At this point you can add your Text any brushes, or
Embellishments. It's entirely up to you !
Also don't forget to add your watermark & © Info.
You can now either leave as it is or carry with the next step.
Open up Animation Shop
4, In Psp Go to the Original oval shape layer & select/select
all/float/defloat/modify/contract 6.
Go to Effects/MuRa's Meister/Clouds Using these settings:

Selections/Select none. Edit/Copy Merged & Paste as new
Animation into Animation Shop.
Repeat the above steps ,But this time click on the Reset
Colours button 1 time, Ok
Edit/Copy Merged/Paste After Current Frame in Animation Shop.
Back into Psp Repeat the above step, just changing the Reset
Colours button again.Ok.
You should now have 3 copies of your tag in Animation Shop.
5, Back into Animation Shop, Now edit select all/Animation
/Frame Properties. I changed mine to 70,
Click on the View Animation tool & if you're happy save as gif
!!
This Tutorial was Written By Rachel 18th October 2007
Exclusively For Tag it.
Any Resemblance to any other tutorial is purely coincidental &
unintentional.

Tutorial written using Psp9.
Supplies
I am using the gorgeous art of
Keith Garvey, You can purchase a license Here
Scrap Kit Of your choice Or the
one I am using.
Which is a freebie called India
Rose -You can't get this anymore
Mask of choice
Font of your choice. The one I
am using is Century Gothic
Let's get started!
Open up all your supplies
& minimise them for now.
New blank canvas 700x550, Fill
white.
Copy & paste the frame as a new
layer & resize. Inside the frame click with your magic wand.
Selections/Modify/Expand 5.
Copy & paste a paper of your
choice, resize. Selections/Invert delete.
Move the paper layer below the
frame layer. Add your tube & erase parts that you don't want.
Now add embellishments.
Add subtle drop shadows to the
frame, Tube & Embellishments.
Open a new blank canvas 500x500
, Copy & paste another paper onto the canvas.
Now bring up my mask. Layers
/New mask layer from image.
Invert mask data checked.
Layers/Merge Group.
Copy & paste your mask onto your
canvas beneath the frame layer.
Add your text & correct © Info .
That's it finished!
This Tutorial was Created by
Rachel 1st August 2008.
And is an Exclusive for Sweet
Euphoria.
Any resemblance to any other
tutorial is strictly coincidental.
Tutorial written using Psp9.
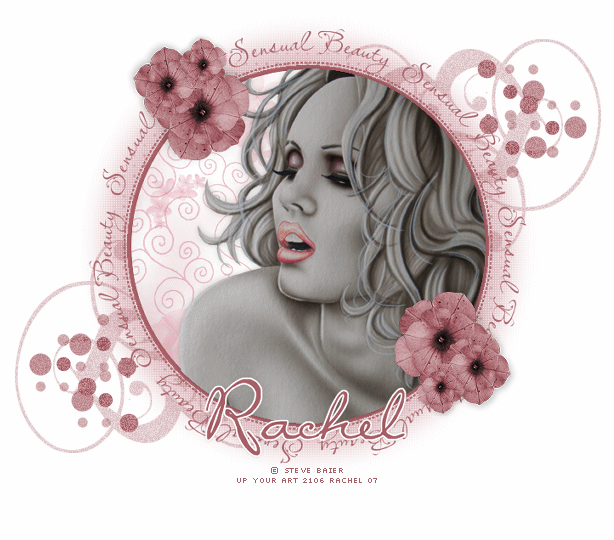
Tube of your choice, I am using the beautiful artwork of Steve Baier.
Do not use his art unless you have a license from Up Your Art.
Up Your Art is now closed but you can now purchase his art
from CDO
Flower Is from Scrappy Expressions. Thank you Melissa.
No longer Exists.
Scrap paper & Doodles/Brushes of your choice.
Fonts of choice - I used Miss & Lavishly Yours Rob [ Pay Fonts.]
Filters
Eye candy 4000
Penta dot & cross
Open up all supplies into psp.
Ok on with the tutorial.
1, Open up a blank canvas 700x500 & Flood fill white.
Grab your preset shapes tool & draw out a nice sized circle .
Linestyle- solid
Width - 5.00
Vector Layer.
Background - null
foreground a colour from your tube.
Ok once happy place into position - Objects/Align/Centre in canvas
[ see finished tag for reference]
Convert to raster layer.
2, Now click inside your circle with your magic wand, Bring up your scrap paper [Resize if necessary].
Copy & paste as a new layer into your circle. Selections/Invert & hit delete.
Keep selected bring up your tube & copy & paste as a new layer, Place into position & hit delete.
Add a subtle drop shadow.
3,Grab your preset shapes tool & use same settings as above only change the Fore ground to Null & Background a colour from your tube. Make this circle more or less the same size as the other one.
Duplicate/Adjust/Blur /Gaussian Blur -15.00. I lowered the opacity to 50%, The choice is up to you.
Go to Effects/Penta /Colour dot. Use these settings:
Value - 90
Distance -2
Colour R- 255
Colour G -255
Colour B - 255
Ok.
Layers/arrange/move down , So this layer should be the one above your White background.
4, On your duplicated layer go to Effects/ Eye candy 4000/Weave using these settings:
Ribbon width - 9.30
Gab width - 3.10
Shadow strength -50
Thread detail - 50
Thread length - 3.41
Check - make gaps transparent.
I drew a dotted circle a little bigger than the main circle, using a colour from my tube.
5, Add your flower embellishments & anything else you want to add.
I also added the words Sensual Beauty, in circular text.
Just draw out another circle a little bigger on a vector layer, Do not convert to raster.
Then add your text using these settings :
Create as Floating, then hover the little A over the circle, when you are happy with the text, Promote selection to layer & delete the circle.
Add your name, watermark & the correct © info . Merge visible & save a Jpeg or Png file..
Thank you for trying my tutorial, I hope you enjoy it as much as I did writing it.
.:Hugs Rachel:.
Layout and Tutorial Rachel written on 4TH November 2007 .
Friday, 5 February 2016
My Sweet Valentine

This is a quickie.. But you need to have a good working knowledge of the programme
I'm using Psp9, But can be done in other versions!
•••
What you will need.
I am using the beautiful art of Arthur Crowe
Tube is called :Black Woman you can purchase
tube from his site Here you must have a license to use Arthur's Art!
•••
Scrap Kit is a mini Freebie:Loving Spirit By Vanessa's Creations
*No longer available*
You will need to register to download the freebie!
If you type Freebie in the search bar it will come up
with lot's of other beautiful freebies :)
•••
Mask of choice or you can use the same one as I am: Vix_BigMask001
By the lovely Vix Here
Thank you honey ♥
Vix has lot's of fantastic goodies go Download them all hehe!
And don't forget to say Thank you :)
•••
Free Font:Good Karma
•••
Ok let's get started.
1,Open up a new Image 800x800, I like to go big & then resize later.
Floodfill with white.
2,Resize Paper1 by 30%, Copy & paste as new layer on to canvas.
make sure mask is open in psp.
Layers/Newmask layer/From image.
Find the mask. Source Luminance checked then click ok.
Merge group in layer pallette.
3,Open up element freebie 3. resize to your liking, Click in the centre of the frame with your magic wand/ expand by 5
Open up paper2 rezise 30% copy & paste as a new layer below the frame.
Selections /invert/delete. Keep selected.
4, Add your tube/image of choice below the frame but above the paper.
as it should still be selected & on inverted you can just delete/Select none.
Duplicate tube. On duplicated tube/image
go to Effects/adjust/blur/gaussianblur/5
Then change blend mode to screen or one of your choice.
Add a subtle drop shadow to original tube & frame v/h=3, O=35,B=8,C=Black.
5, Now add the elements & word art to your liking,
after all this is your creation :)
6, Add your text & © info.
I Deleted the white background layer & merged visible,
Save as png or jpeg.
•••
TaaDaa you have finished :)
Please feel free to share your lovely creations with me so I can share them on my blog!
I hope you enjoyed this quickie Tutorial
Hugs Rachey ♥
Tutorial created By Rachey on 5th February 2016
Subscribe to:
Posts
(Atom)
About Me

- Rachey
- I'm 52 live in a lil village in South Yorkshire UK. I love going to gigs. Especially Rock or Punk..